
Subcutaneous Injection Processes
Published on:
Updated on:
People are asking...
What works better in your experience, subcutaneous injections or intramuscular injections. Are there pros and cons to each that should be considered?...
In practical terms subq takes longer but requires less knowledge/skill to perform & is typically less painful due to the size of the needle & location. For IM is requires a bit more knowledge, can hol... See Full Answer
Is there a substantial difference between sub-q injections and IM?...
Yes and no. In practical terms subq takes longer but requires less knowledge & is typically less painful due to the size of the needle & location. For IM is requires a bit more knowledge, can hold a l... See Full Answer
I have 2 questions. Which route is better ? IM or subcutaneous? Best syringe gauge and length?...
Great question, and the answer is: It depends. IM has the benefit of being less frequent as you can inject larger volumes into muscle than you can into fat. If this makes a patient more compliant with... See Full Answer
Have a question? Ask us.
At AlphaMD, we're here to help. Feel free to ask us any question you would like about TRT, medical weightloss, ED, or other topics related to men's health. Or take a moment to browse through our past questions.
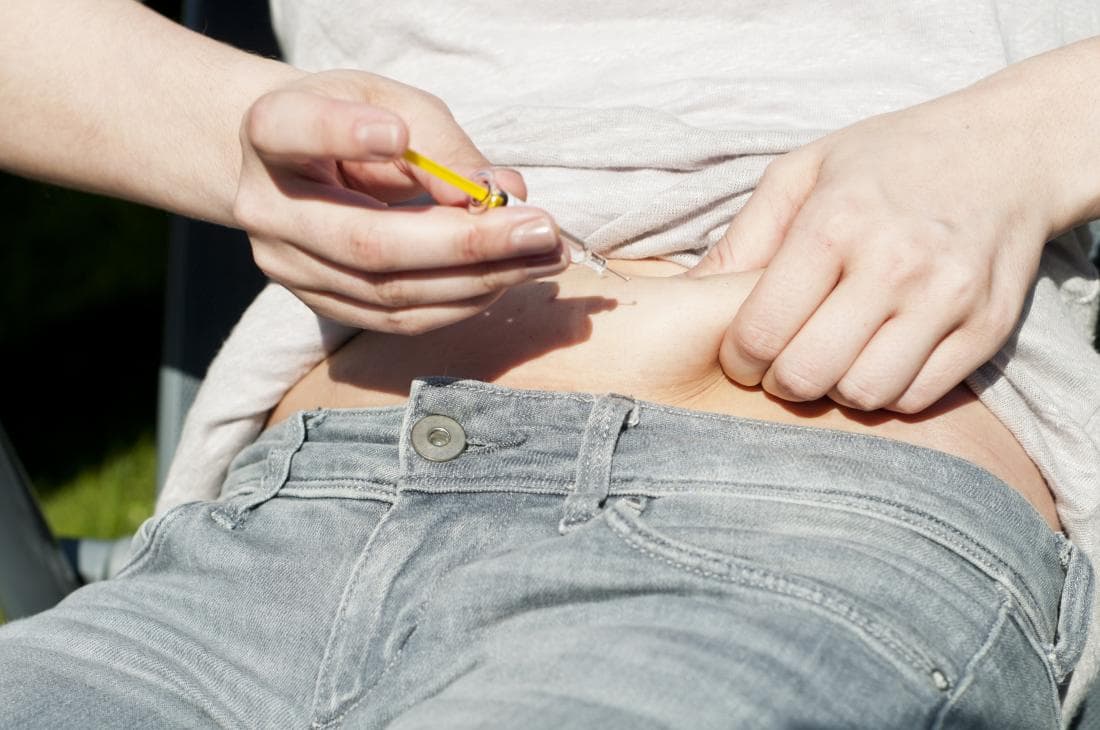
Injections can cause some anxiety if you've never done them before, but it's quite easy once you've done it a few times. Let's talk about the process.
Review these steps below then watch this YouTube video to watch how the final steps should look.
Medication:
This does not need to be kept refrigerated. In-fact, warming up your vial via a minute in clean hot water before injecting (then drying & cleaning it) can help to reduce discomfort after.
Preparation:
Wash your hands. Place all the materials you will need within easy reach in a clean place free of distractions. Clean the top of your vial with an alcohol prep pad. Assemble your syringe while avoiding letting anything touch the tip of the syringe where it connects to the needle, or the bottom of the needle where it connects to the syringe. Pull the plunger back to suck in air equal to your injection amount.
Hold the vial upside down, insert the needle, depress the plunger to inject the air into the vial, then pull back the plunger to have the appropriate dose of medication in your syringe. Withdraw, recap, and set aside your syringe. Clean the desired injection site with another new alcohol prep pad in a circular motion from the center outward.
Injecting:
When selecting an exact injection spot in a fatty area that you’ve cleaned, avoid any visible surface veins. If something feels very painful or wrong, once you've made it through the skin, stop injecting. One in fat, you should not hardly feel anything. Then with new preparation & supplies select another location instead. With practice, most injections do not cause much discomfort.
It helps to hold your skin firmly as you insert the needle with your other hand holding the syringe. Once inserted, you can let go of the skin while continuing to hold the syringe with your current hand, using the hand which was holding the skin to inject your medication. The slower you inject, the better it will feel later (a fast 5 seconds vs a long 30 seconds).
Once your medication is fully injected, wait a few more moments & pull the needle back out the exact angle that you inserted it in. With all of this, slow & controlled is the goal. Cap your needle (do *not* put the cap on via pressing on the top, use the sides, you may use too much force & break the plastic sticking yourself otherwise). Unless there is blood, you may not need a bandage for the small needles used in subcutaneous injections.
Now lastly, review the video for a general review of the final steps.
If you have additional questions not answered above, contact us to clarify at Contact@AlphaMD.Org
Have a question? Ask us.
At AlphaMD, we're here to help. Feel free to ask us any question you would like about TRT, medical weightloss, ED, or other topics related to men's health. Or take a moment to browse through our past questions.
People are asking...
What works better in your experience, subcutaneous injections or intramuscular injections. Are there pros and cons to each that should be considered?...
In practical terms subq takes longer but requires less knowledge/skill to perform & is typically less painful due to the size of the needle & location. For IM is requires a bit more knowledge, can hol... See Full Answer
Is there a substantial difference between sub-q injections and IM?...
Yes and no. In practical terms subq takes longer but requires less knowledge & is typically less painful due to the size of the needle & location. For IM is requires a bit more knowledge, can hold a l... See Full Answer
I have 2 questions. Which route is better ? IM or subcutaneous? Best syringe gauge and length?...
Great question, and the answer is: It depends. IM has the benefit of being less frequent as you can inject larger volumes into muscle than you can into fat. If this makes a patient more compliant with... See Full Answer
Get $30 off your first month’s order
Enter your email address now to receive $30 off your first month’s cost, other discounts, and additional information about TRT.
Legal Disclaimer
This website is a repository of publicly available information and is not intended to form a physician-patient relationship with any individual. The content of this website is for informational purposes only. The information presented on this website is not intended to take the place of your personal physician's advice and is not intended to diagnose, treat, cure, or prevent any disease. Discuss this information with your own physician or healthcare provider to determine what is right for you. All information is intended for your general knowledge only and is not a substitute for medical advice or treatment for specific medical conditions. The information contained herein is presented in summary form only and intended to provide broad consumer understanding and knowledge. The information should not be considered complete and should not be used in place of a visit, phone or telemedicine call, consultation or advice of your physician or other healthcare provider. Only a qualified physician in your state can determine if you qualify for and should undertake treatment.